- Published on
스프링 - Http Interface
- Authors

- Name
- 이건창
스프링 버전 3 부터는 HttpExchange 를 지원한다. 간단하게 인터페이스를 선언하고 빈으로 구현체를 등록하면 쉽게 사용할 수 있는 방법이다. 다음처럼 컨트롤러에서 선언하듯이 인터페이스를 구현하면 된다.
interface SendClient {
    @PostExchange(value = "/send/{channel}", accept = [MediaType.APPLICATION_JSON_VALUE])
    fun send(
        @PathVariable channel: String,
        @RequestParam channelKey: String,
        @RequestParam title: String,
        @RequestParam content: String,
    ): SendResponse
}
빈으로 등록하는 구현체는 다음처럼 추가하면 된다.
RestClient 방식
@Bean
fun sendClient(
    senderServerProperties: SenderServerProperties,
): SendClient {
    val restClient = RestClient.builder()
        .baseUrl(senderServerProperties.baseUrl)
        .build()
    val restClientAdapter = RestClientAdapter.create(restClient)
    val factory = HttpServiceProxyFactory.builderFor(restClientAdapter).build()
    return factory.createClient(SendClient::class.java)
}
RestTemplate에서 RestClient 변경할 때 주의할 점이 있다.
To reduce memory usage in RestClient and RestTemplate, most ClientHttpRequestFactory implementations no longer buffer request bodies before sending them to the server. As a result, for certain content types such as JSON, the contents size is no longer known, and a Content-Length header is no longer set. If you would like to buffer request bodies like before, simply wrap the ClientHttpRequestFactory you are using in a BufferingClientHttpRequestFactory.
RestClient및 에서 메모리 사용량을 줄이기 위해 RestTemplate대부분의 ClientHttpRequestFactory구현은 더 이상 서버로 보내기 전에 요청 본문을 버퍼링하지 않습니다. 결과적으로 JSON과 같은 특정 콘텐츠 유형의 경우 콘텐츠 크기를 더 이상 알 수 없으며 Content-Length헤더가 더 이상 설정되지 않습니다. 이전과 같이 요청 본문을 버퍼링하려면
ClientHttpRequestFactory를BufferingClientHttpRequestFactory로 래핑하하면 됩니다.
라고하니 멀티플렉싱으로 인해 content-length가 중요한 http 2 버전에서는 주의가 필요하다. 다음처럼 작성해 버퍼링한 뒤 전달하도록 하자.(물론 그만큼의 성능 향상은 보기 어렵다.)
val bufferingFactory = BufferingClientHttpRequestFactory(SimpleClientHttpRequestFactory())
val restClient = RestClient.builder()
    .defaultHeaders {
        it.setBasicAuth(apiUsername, apiToken)
    }.baseUrl("https://$subdomain/api")
    .requestFactory(bufferingFactory)
    .build()
RestTemplate 방식
@Bean
fun sendClient(
    senderServerProperties: SenderServerProperties,
): SendClient {
    val restTemplate = RestTemplateBuilder()
        .rootUri(senderServerProperties.baseUrl)
        .build()
    val restTemplateAdapter = RestTemplateAdapter.create(restTemplate)
    val factory = HttpServiceProxyFactory.builderFor(restTemplateAdapter).build()
    return factory.createClient(SendClient::class.java)
}
WebClient 방식
@Bean
fun sendClient(
    senderServerProperties: SenderServerProperties,
): SendClient {
    val webClient = WebClient.builder()
        .baseUrl(senderServerProperties.baseUrl)
        .build()

    val webClientAdapter = WebClientAdapter.create(webClient)
    val factory = HttpServiceProxyFactory.builderFor(webClientAdapter).build()
    return factory.createClient(SendClient::class.java)
}
빈 선언 방식도 크게 차이나진 않으니 쉽게 교체할 수 있다. 다만 WebClient는 반환값을 Mono, Flux로 반환해야 의도한 Reactive 방식으로 동작한다.
AS-IS
fun send(pendingNotification: PendingNotification) {
        val sendingNotification = try {
            val response = sendClient.send(/*...*/)
            SendingNotification.success(/*...*/)
        } catch (e: Exception) {
            SendingNotification.error(/*...*/)
        }
        when (sendingNotification.sendResult) {
            SendResult.SUCCESS, SendResult.FAIL -> 성공이력_저장(/*...*/)
            SendResult.ERROR -> 실패이력_저장(/*...*/)
        }
    }
TO-BE
fun send(pendingNotifications: List<PendingNotification>) =
        Flux.fromIterable(pendingNotifications)
            .flatMap { notification ->
                sendClient.send(/*...*/)
                    .map {
                        SendingNotification.success(/*...*/)
                    }.onErrorReturn(
                        SendingNotification.success(/*...*/)
                    )
            }
            .map { notification ->
                when (sendingNotification.sendResult) {
                    SendResult.SUCCESS, SendResult.FAIL -> 성공이력_저장(/*...*/)
                    SendResult.ERROR -> 실패이력_저장(/*...*/)
                }
            }
            .subscribe()
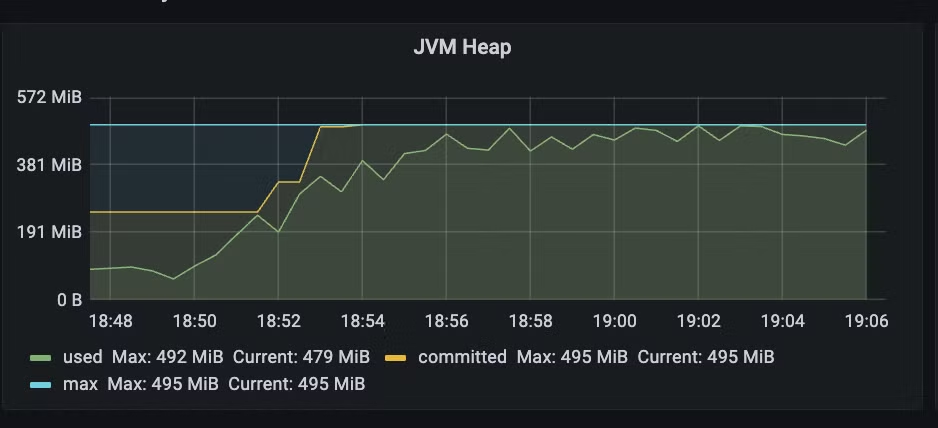
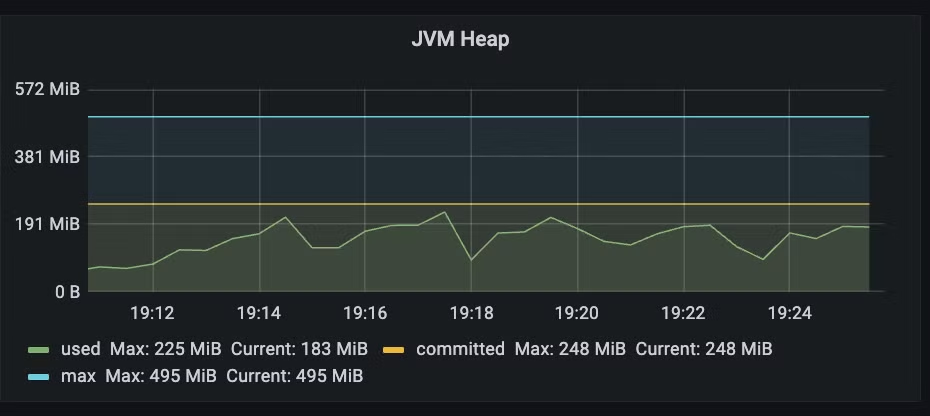
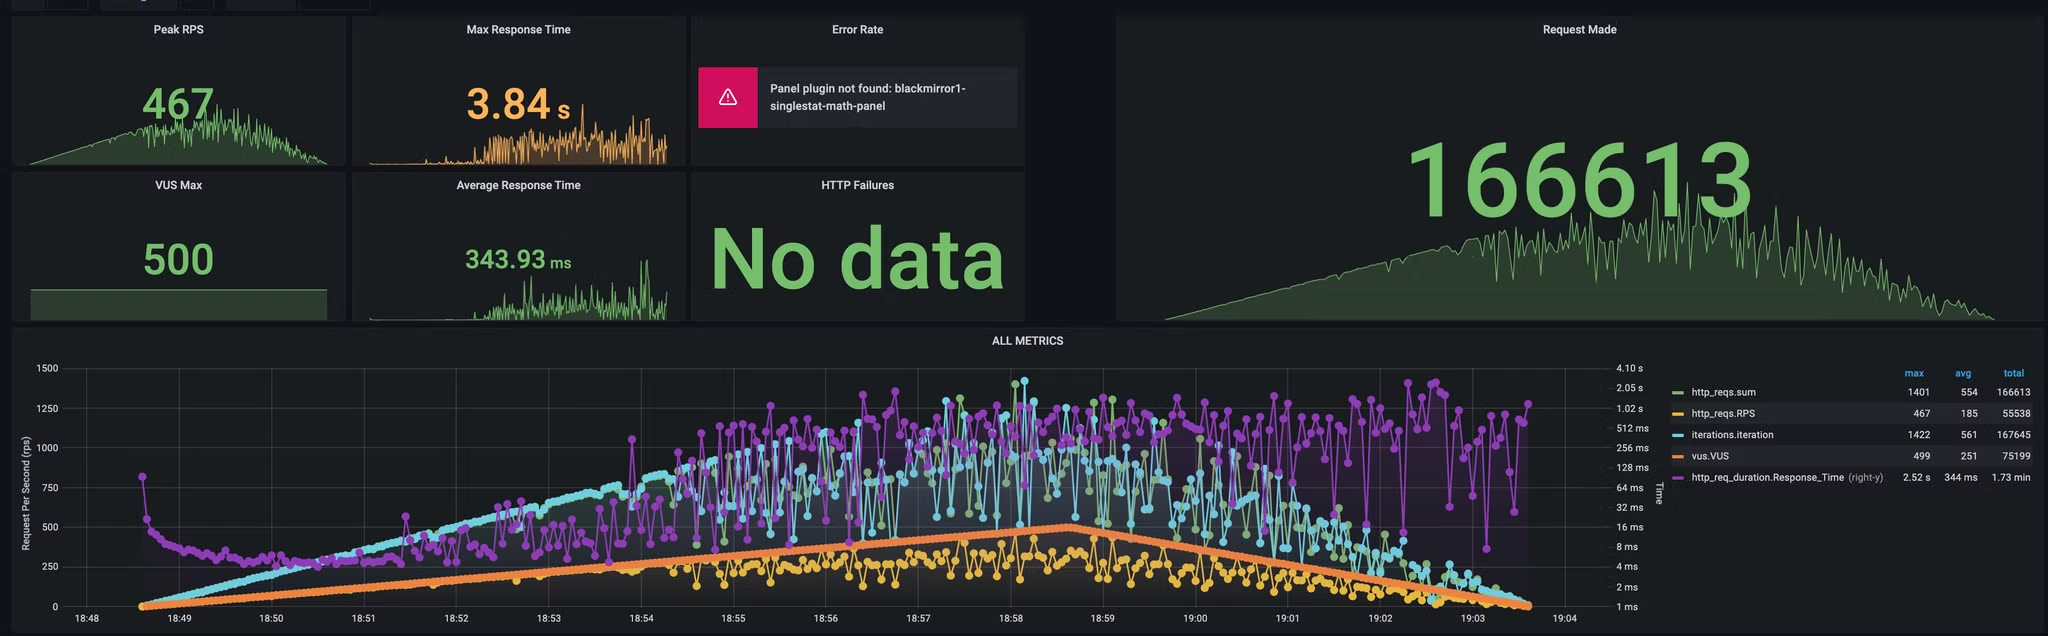
변경하는 만큼 리소스 차이도 굉장하다. 동일한 요청으로 비교한 경우를 확인해보자.
스레드 상태부터 확인하면 restclient는 요청 보내기 전에 대기하는 스레드가 13k 나 대기한다. 반면 webclient는 대기하는 요청 수가 2 정도다.
| restclient | webclient |
|---|---|
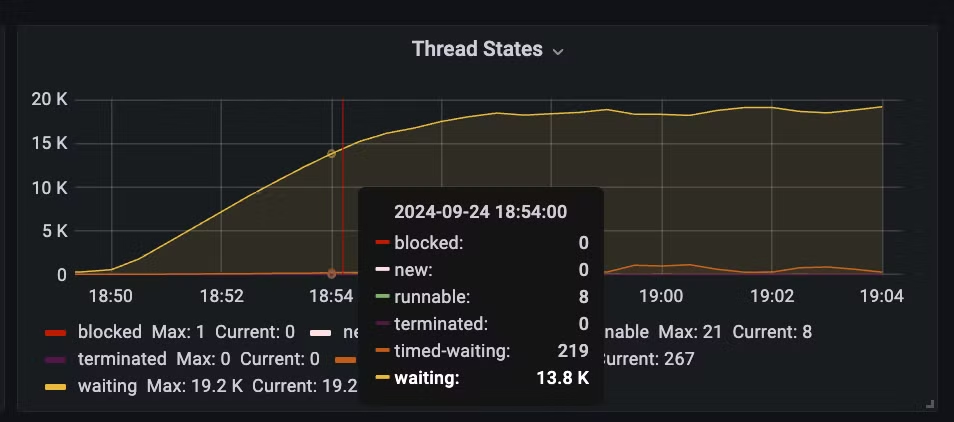 | 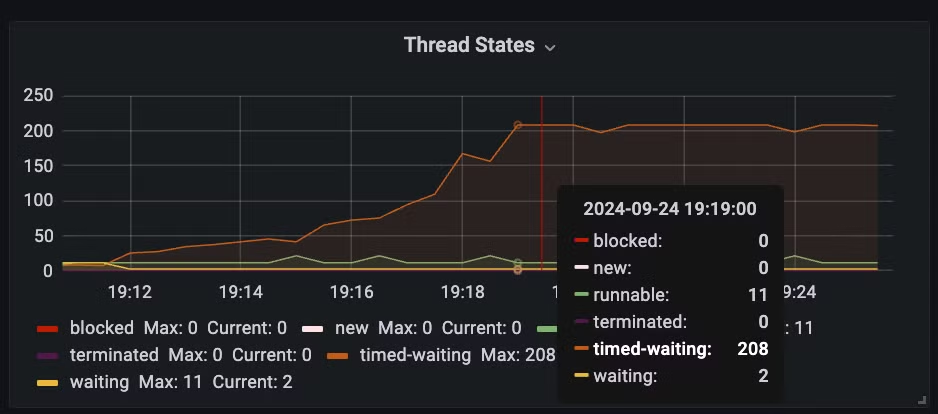 |
- waiting thread : pool 고갈로 대기하는 스레드 수
- timed-waiting : 통신 후 응답을 대기하는 스레드 수
restclient를 사용하면서 요청 당 스레드를 하나씩 생성하기 때문에 메모리 소모도 극심하다. 반면 webclient는 스레드 풀을 이용해 요청을 보내기 때문에 메모리 소모가 적다.
| restclient | webclient |
|---|---|
 |  |
restclient는 요청 대기 덕분에 응답 시간이 길어진다. 반면 webclient는 스레드 풀을 이용해 요청을 보내기 때문에 응답 시간이 짧다.
| restclient | webclient |
|---|---|
 |  |